Good evening fellow people and welcome episode 2 of Midnight-Master-Model
I have a very special and especially lengthy model on the bench for you today. The infamous MAZ-537 g by trumpeter, but, it is just a truck, how can we make this model worthy for MMM? A good question and a simple answer: PAIN, well, not directly, but indirectly – let me explain, but first of all, the materials I used that you can also use to recreate this version:
Materials
MAZ-537g late Production with ChMZAP-5247G – Trumpeter 00212 scalemates
MAZ-537g (late Production) – Voyager PE35278 scalemates
V-54 Engine – MiniArt 37006 scalemates
Ural 4320 – Zvezda 3654 scalemates
Polystyrene sheet, copper wire, spare parts, etc…
Pre-Build – why?
That is the question I ask myself now looking back. I could have had it simple. The MAZ-7310 or the M983 are fabulous kits on a similar topic, but no, the market of used kits decided my faith once again. Just like it did so many times already. So? where exactly is the problem now? Based on one of my references I wanted to remove both the winch as well as the cover for the fuel tanks. The problem this created: direct sight onto the engine and the gearbox, great, right? right? Not great at all. The transmission is lacking essentially all its details, a lot of wires run through the frame and the engine is just straight up missing.
As the true extend of this operation became visible I decided to turn it into the model it is now. The additional PE was already included when I bought the kit, at first I only wanted to use the most prominent parts. But considering the work now needed this was “just a few more days”.
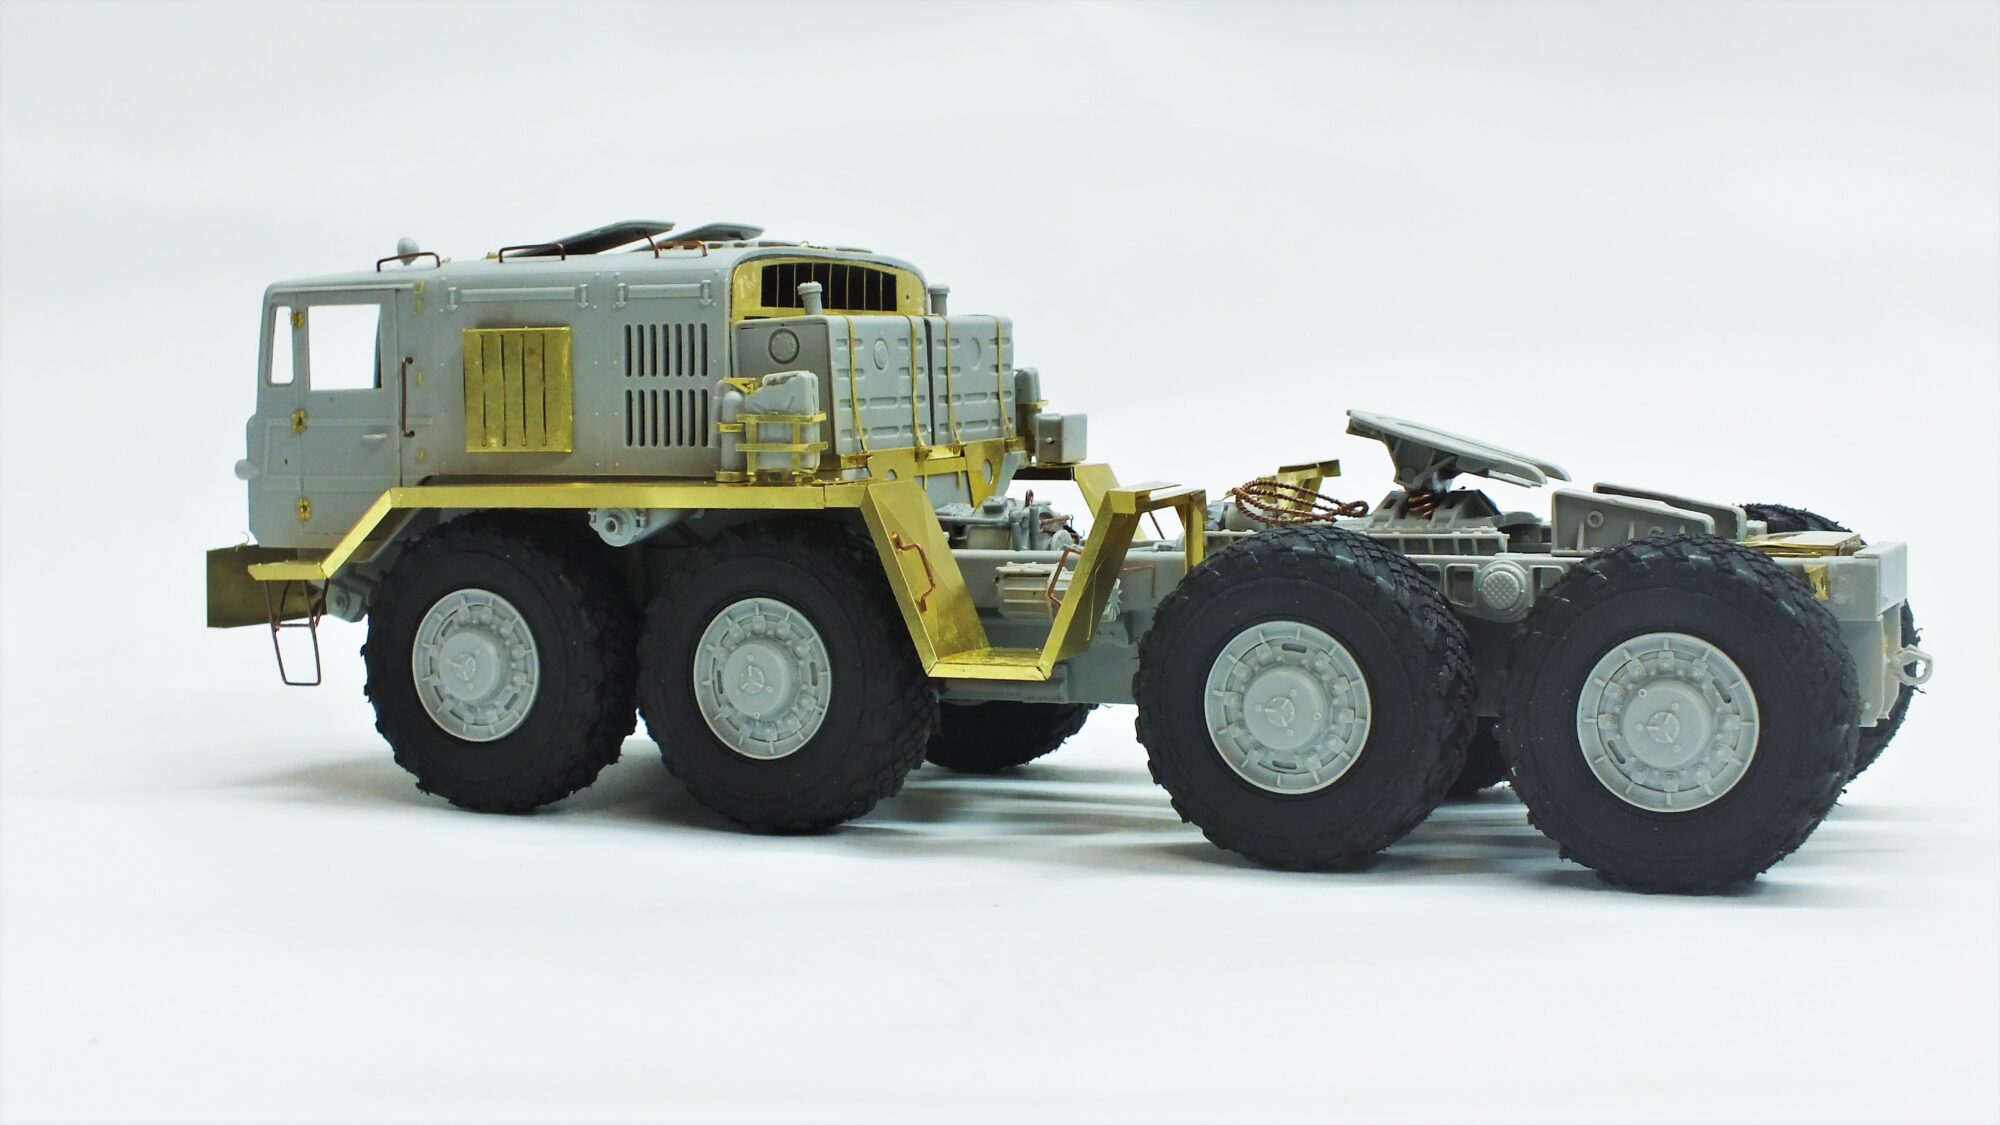
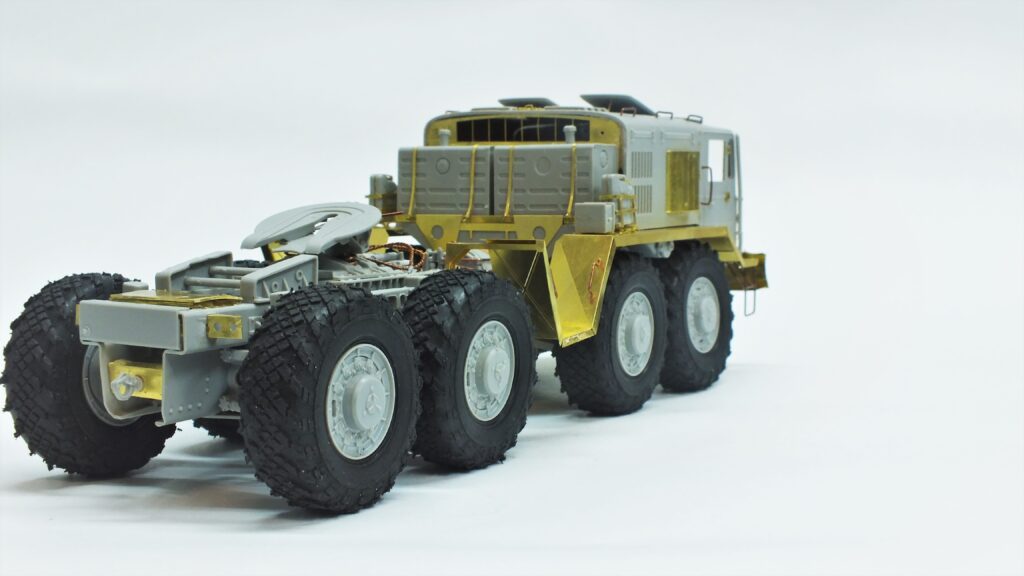
Build – A monster arises
A monster of work. The first point on the to do list was the usual assembly of the kit and the PE-aftermarket set. This turned out to not make any form of major complications. They are Trumpeter and Voyager kits after all, so they went together like a dream. The suspention was a tad bit complicated, but no real challenge. Not something for a first time builder, but certainly managable. Only looking at these things this model is actually not that bad.
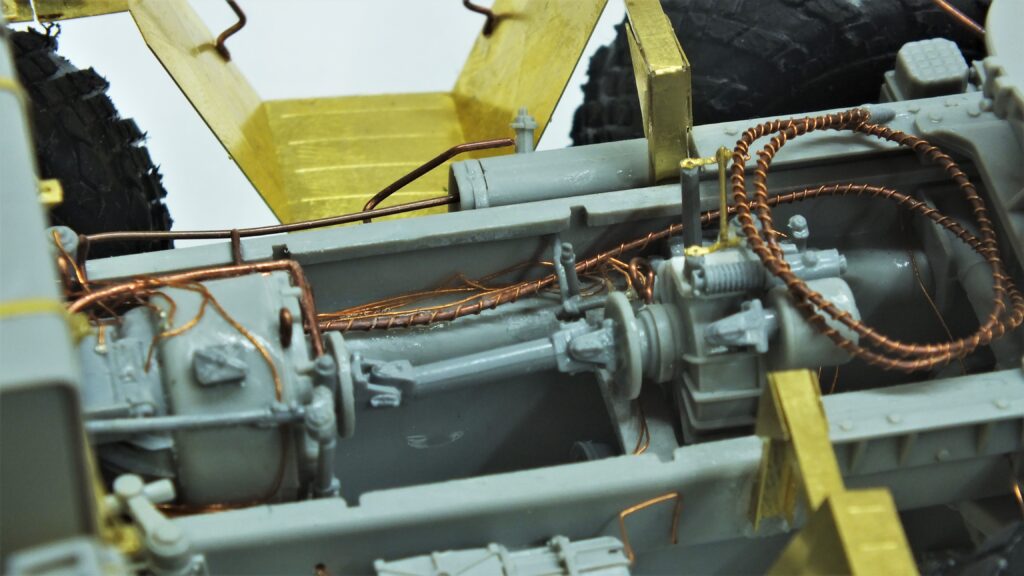
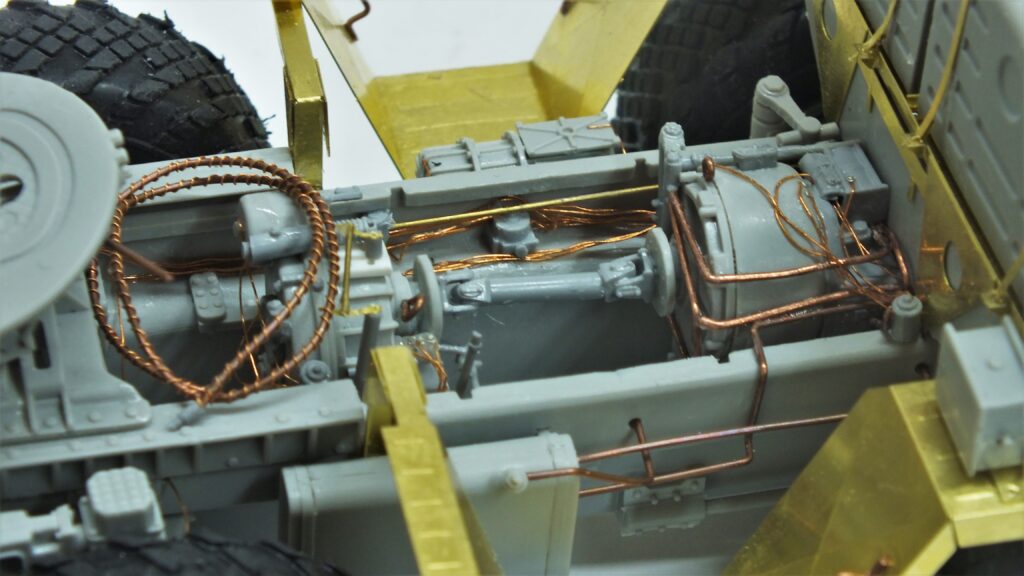
Transmission and Frame
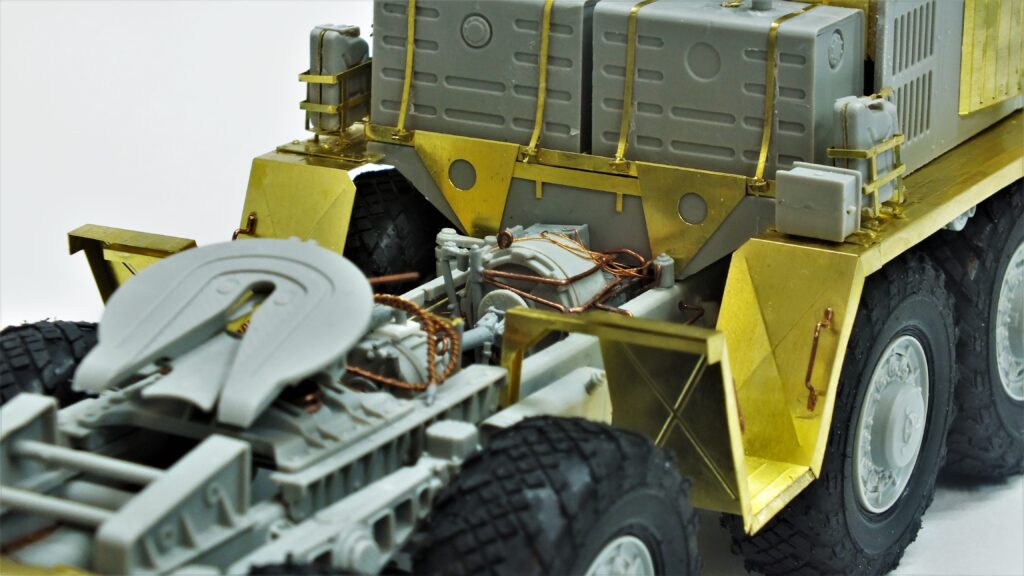
The area where I almsot spand the longest hadn’t there been the engine. As some of you might remember I had the URAL-375 by Zvezda resting on the shelf-of-shame for a long time. Now it was finally put to good use. I used and also changed most parts of the frame, transmission and engine here to replicate the MAZ-537g as closely as possible. It is not an exact representation, but that was never the goal. I also added some scratch-building to enhance the detail furtehr.
The biggest change however done was the wiring and tubing. All, yes, all, (atleast to my knowledge) wires and tubes in the chassis were recreated using copper wires. Usualy crafting Copper wire from my local hobby-shop as well as the wires from an old electric magnet. These super thin wires (0,1mm) created the back-frame for the entire cable-tree running through the chassis. Most cables now end underneath the cabin out of sight from anyone.
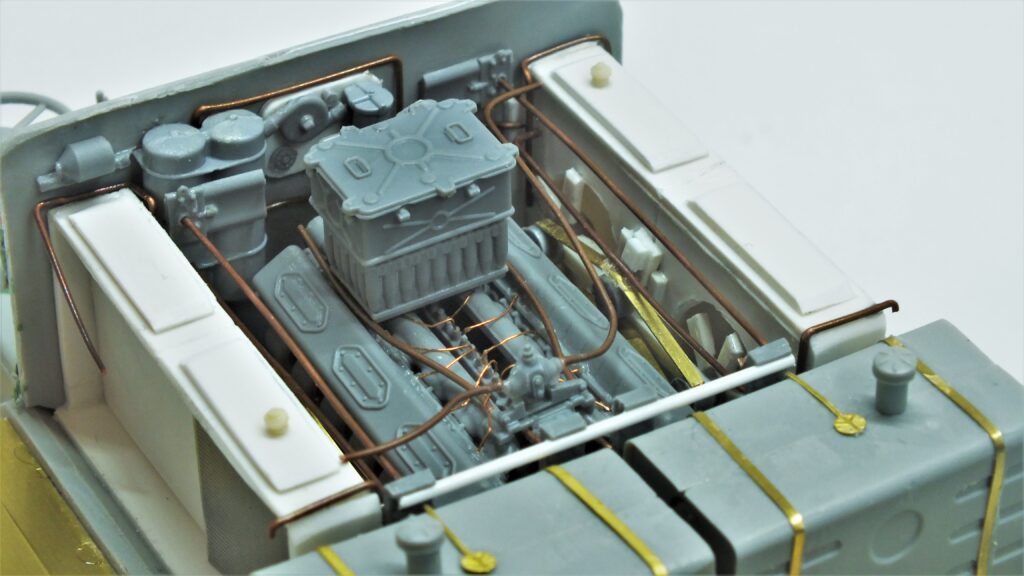
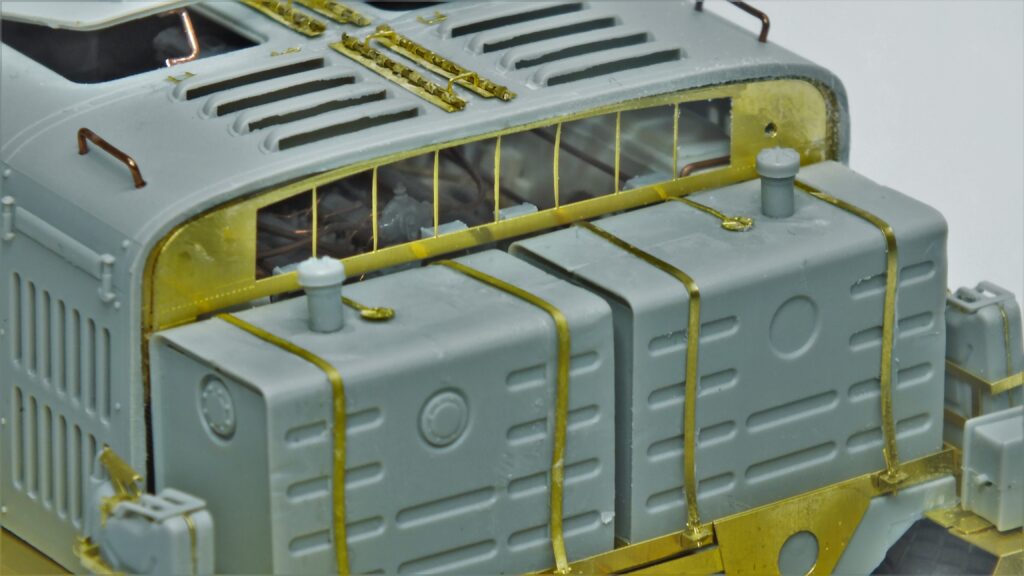
Engine-compartment
This is for sure the area where I spend most of my time. The engine was luckily already available by miniart. The V-54. This engine comes as close as possible to the D12A-525 used in the original vehicle. But don’t let that fool you, so many parts were still missing: All of the details on the firewall were first on the list. Here I used the URAL’s last pieces, most likely the last pieces ever to be used from this fella. The next part was what I dreaded however: The 4 massive radiators on both sides of the engine. In the end I had to scratch-build these from the ground up using styrene sheet and old pieces of sprue. They may not be great, bit good enough. Last but not least I also added the most striking tubes and wires in the engine bay as well as the rods and gears surrounding the engine.
Interior and other improvments
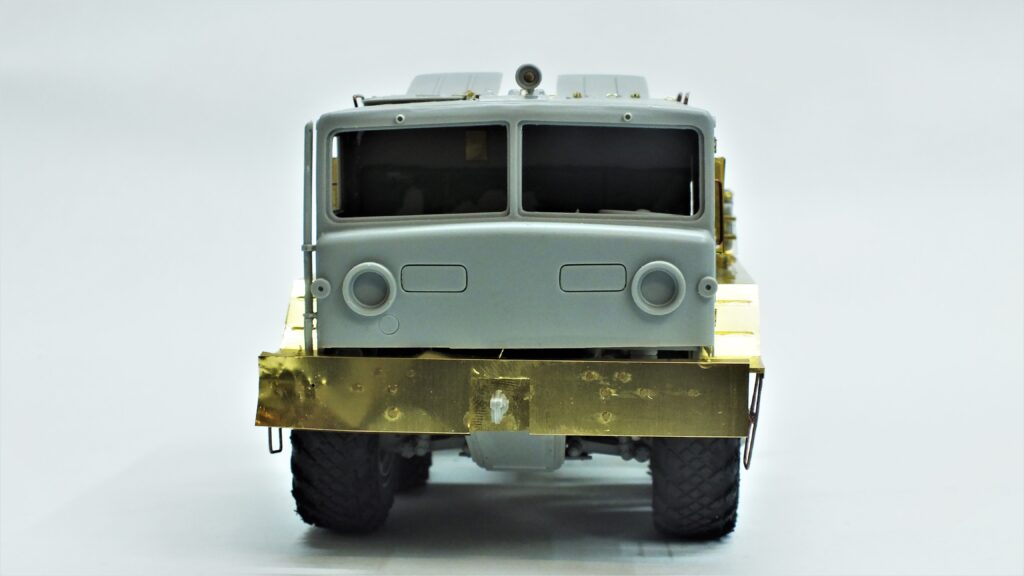
This was the easiest part. The Cabin also recieved some love. I resculpted the seats using greenstuff and also added some wires. The rest was “just” the usual procedure. Replacing the grab-handles and steps with copper-wire, making some damage to the fenders and bumper. And that is pretty much it. A lot of work put together in a short article because of the lack of time. I still hope however that it was of use to some of you. Now: last but not least – beaty-shots:


Post-build – done
Even when considering the extreme amout of work this subject just consumed I am extremly satisfied with the result. I am very happy about the frame, which in all hoesty made a lot of fun. The engine was, well, the engine was just pure pain, but certainly exploring this new area of modelling was a lot of fun and also expect a lot more in the near future of these. The m983 will form this models “brother”, but more about that model once it is his time to shine. What do you think? Do you want to see more of these kind of models? Let me know. Here as a comment or write me an email.
Until we meet again!
Floh out.
It is not my first time to visit this web page, i am visiting this
web site dailly annd obtain pleasant information from here everyday.
Great to hear that,
it makes me very happy to hear that you enjoy the articles and my work here. Also thank you very very much for you to come and visit here every day even though the uploads are less than irragular.
Have a great day and I hope you enjoy your stay here in the future
Floh
Hey people!!!
HAVE A NICE DAY
Hello!
Good cheer to all on this beautiful day!!!!!
Good luck 🙂
I like the efforts you have put in this, appreciate it for all the great blog posts.
I got good info from your blog
I like this weblog its a master peace ! Glad I found this on google .