
Good evening fellow people, today on the table: the might TKS-20,
finally, finally another project finished, and also a very important one, since this is the first requested project I have completed. So, today on micro-models we have: The tks-20 in 1:35th scale, as usuall. First of, what do we need:
Materials
Well, simple here, just some sweet out-of-box action:
TKS-20 – IBG Models 35046 scalemates
and tape, brushes, sponges, clours, earth-texture-paste, real dirt and grass-fibers, yes, that’s all

Construction – We chilling
What is there really to say here? It is in the end just a simple out-of-box build. I just want to flesh it into a detailed articel here, but I seriously don’t know what to write here. It is mostly possible to just straight up follow the instructions, however I did take a few different approaches. Especially to ease the painting of the interior. In case you just want to build the exterior, go ahead and just follow the instructions and skip to the exterior painting. However in case you want to also do the interior I invite you to also take these few changes:
Well, now onto the small changes that had to be made in order to paint the interior properly. Some very simple changes: Of course I do prefer to first only assembe the interior and basic shell of the tank and only then proceed with the exterior. Exactly this is also what I did here and something I would do with all my models. A small additional change was to leave some parts removable, like for example the engine, gun, radiator or the seats. Additionally to these basic changes I always do, there are also some specific to this model, notably the fenders:
The kit suggests to glue these to the lower hull and attach the upper hull later. I however changed the order. I glued them to the upper hull first – why? Simple reason. In that place they would not obstruct the later assembly of the running gear and this position also eased the painting of the interior. Doing this prevented any ugly glue stains in the interior which would be visible from the outside.
Interior Painting – Yippie
Well, the interior painting isn’t anything to write home about. First of all the base painting: Instead of the bright clean white I opted for light-grey, since it feels way less out of place and is a simple artistic liberty I am taking. The rest was painted in dark-grey, khaki, and the usual details. I kept the weathering very simple here, since I did not want to overload the model, since this is a very real threat when dealing with such a small subject.
The weathering was done in just three stages here: First: discoloration, earth effects and a pinwash in one go. I did this using a dark-brown wash. First applied to all details like a pinwash, then making streaks and creating artificial shadows. I made the eartheffects using very soft brush. This distributed the paint evenly creating the effect of minor dust and grime. The second and third step were chipping. First with the usual dark-brown steel color and lastly with a dull silver paint on all of the dark-grey parts to highlight them.
In the end even though these were very simple techniques I am very satisfied with the result and for these “simple” interior models I will keep this way of working in mind. Of course, when dealing with cut-away models I will have to use more and more complexe techniques. But now, some pictures of the finished interior:


Exterior Painting – nay
First of, I did not name this part because I am dissatisfied with the result, but rather because I kinda lost motivation for the model. I believe that the final result is actually very satisfying. But how exactly did I achieve it?
First of all the base- and detail painting. Nothing special to tell here. I decided to use a dark-yellow-brown colour as the base-paint. I did this in order to replicate the colour found in the game “World of Tanks” as a small easter egg for those who know, since it has been made popular by this franchise. Details were painted using the same colour as always. Dark-brown for steel and tracks, dark-grey for rubber, medium-grey for the gunbarrel and ocher for the wooden handle on the shovel. Last details in this stage included the tail and front-light as well as the periscope.
Now, with the base-coat completed I switched my attention to weathering. First on the agenda: discoloration. Here I used mainly two colours: a light ocher and a dark brown. This effect was achieved in the normal way. First: wettening the surface, the applying small dots of colurs and then districbuting them with a soft wet brush over the surface in streaks or on specific panels.
After that I continued with highlights and artifical shadows. First: highlights. Here I pick out edges, points or details with a fine brush be painting them in a lighter colour then the base-coat. Here I used again the same ocher as for the discoloration. This can be seen very well on the bolts and the periscope. Following this I continued with artificial shadows. Here I distributed a dark wash evenly in recessed areas. Examples are underneath the hatches, behind the running gear or under the mantlet.
Exterior weathering – eh, ok
Now with the base-coat and first weathering stage completed I could move onto some more serious weathering. First here: a pinwash and panel-lining using the same dark wash that I used for the artificial shadows. I decided to not pick out the bolts of the tank, as they we already highlighted enough by the previous stage. After this I could follow up with the usual three layerd chipping. First: light chips applied by sponge. Second: dark-steel chips applied by sponge and brush. Third: Rust wash on the steel chips.
Now, last but not least: earth effects and final details. I kept these very simple here: First I used some diluted texture paste to build up, well, as the name suggests, texture. I followed this up with a bit of real earth from my garden as well as some grass-fibers from my stash. To finish the earth effects I picked out some final details like small stones or accumulations of dirt using a fine brush and some earth-tones to add sme variety.
And, now the final details: these include the grime on the exhaust and gunbarrel, a piece of glass on the periscope, a silver ring where the gunbarrel slides into the mantlet. Here I decided to not make oil-stains on the running gear, since it already looked good enough as it was, atleast to me.
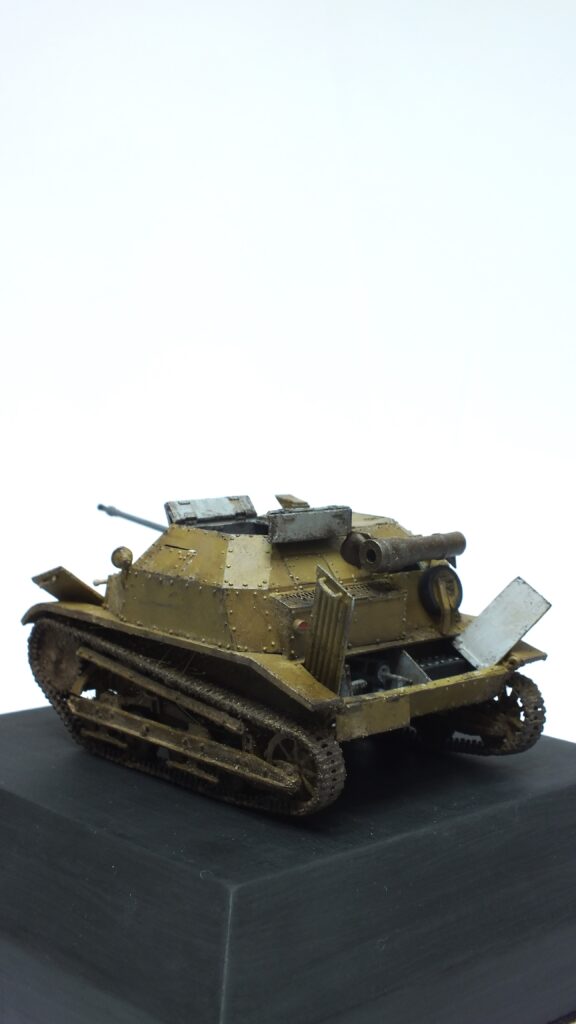
Beauty shots


And? Good model?
Now, with the model finished, what are my thoughts? First of all, about the kit, for the price it is good, the interior is lacking some details and the track is not the easiest to assemble. However the kit comes supplied with a metal gunbarrel, which is a great plus. Also a version with preassembled tracks is available. I would suggest this to everyone new to the hobby. Otherwise the kit is great. Just enugh PE, minimal flash, warping and great fit guarentee a good time.
But, how satisfied am I with the final result? In the end I am luckily able to say that I personally really like the finished result. I do not see any specific flaws at first glance and it feels great to have a finished model. Of course there is always room for improvement, but I luckily do not see any direct flaws with what I made.
You agree or disagree with me on that or have any ideas for the next model? Let me know by writing me a comment or contacting me in any of the following ways.
Crafted with love by Floh
Until we meet again
Floh out
hi!,I like your writing so much! share we communicate more about your post on AOL? I need a specialist on this area to solve my problem. May be that’s you! Looking forward to see you.
Sure, however I do not know of AOL, could you please get into contact with me via the possibilities listed on this site.
Best regards
An interesting discussion is worth comment. I think that you should write more on this topic, it might not be a taboo subject but generally people are not enough to speak on such topics. To the next. Cheers
I’m usually to running a blog and i actually respect your content. The article has really peaks my interest. I am going to bookmark your site and hold checking for brand new information.
hi
Hi