Tonight we will finally finish this little fella I started in 2023, a newy entry for the micro-models series: The M31 T2 armoured recovery vehicel (arv for short) (WIP-article) I did finish him last year already, but I waited with photographing until the workshop rework was done, which was now like two weeks ago. So I will add him to my score for 2025. No worries there.
I am however really happy with the finished result and I think the effect for sure has a lot of similar applications.
Materials
But, let’s start as always with the materials needed for this project:
M31 Takom 2088 scalemates
Tamiya jerry can
Usual tools, bits and pieces (stowage, paints, effect paints, nylon-wire, etc…)
Prestory – A stoney way:
I will be honest, I had a lot of probelms and hurdles with this little guy. After I finished up with the construction I was in really high spirit to start painting and detailing this back then relatively large model. As a first I got done with the base paint very quickly. It however wore off just as quickly as it started. Just a light tap with the finger already removed a good chunk of paint and thus caused me a lot of pain.
I still have no idea why this happened. The surface was not very dirty, greasy or similar. And that, of course killed all motivation for a very long time. I discoverd however that this behaved very flackey. Some spots came of instantaneous and others were surprisingly stubborn. So the task of removing the old paint was just as painfull in the end. It lead to him just sitting sad on one of my shelves in the workshop and that was about it.
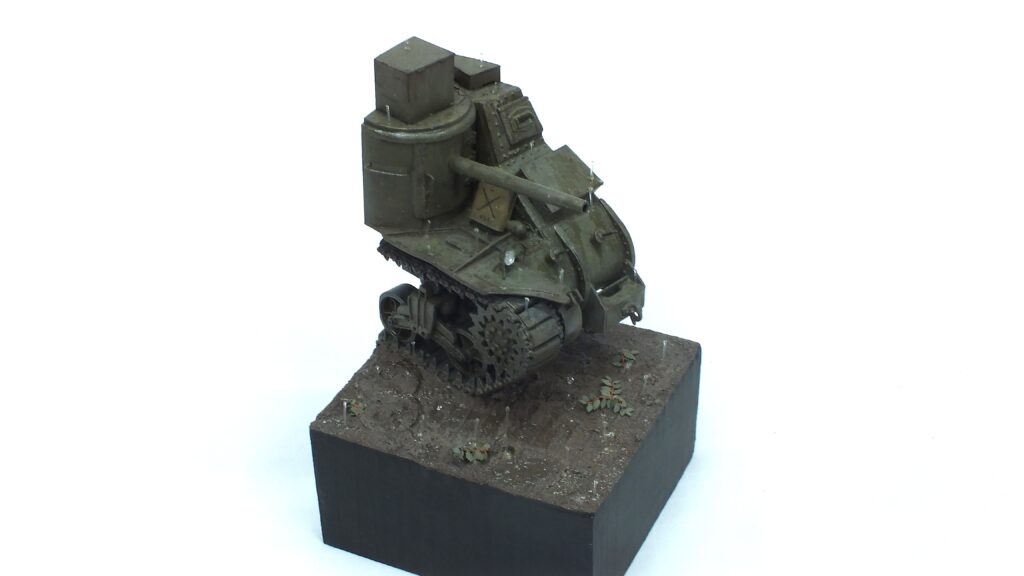
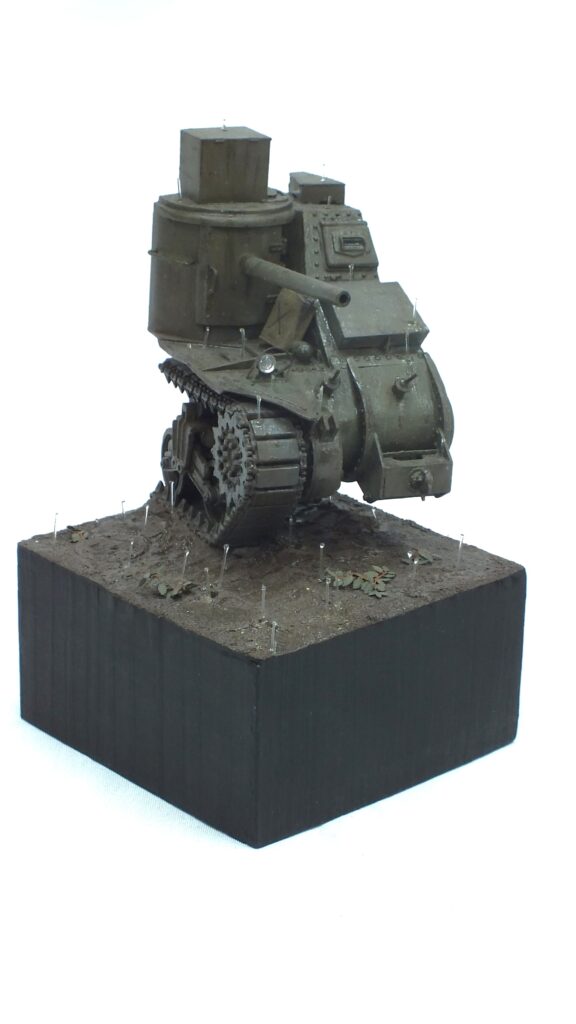
A new plan – I cut a tank in half, no quarters
I thaught to myself “I really do not want to do more than half of this thing”. So that is just what I did. I turned this little fella into a wedgie. It was already far too long since my last one, so it was super convenient to get two points of my bucketlist at once. (Aaaaand I did not have to remove the paint from the entire model, but that did not influence the decision at all, not at all)
I first rough cut the model on the scroll saw and then sanded to final dimension on the belt sander. After that I added polystyrene sheets to close him off and tried my best to cover the gaps. Back then I used greenstuff, which turned out to be an attrocious decision. Normal filler or putty would have been a lot smarter. You can still see my sloppy work in the finished result. At least it is on the back, so that is something atleast.
Last but certainly not least in this conversion I added small metal spikes to the base and bored appropiate holes through the running gear to hold the model with the addition of glue in an upright position.
For the base I turned to my trusty section of cut-off pieces. Turns out a fitting piece was actually just waiting for me. I just sanded it down and added some really simple earth-effects using texture putty. I created some marks from oil/fuel barrels as well as some tires marks, but thats about it. It was hard to decide wether a figure would be a good idea, however my laziness ruled over me and I am not mad at all looking at the final piece.
With that I could finally (cough cough, irony, cough cough) get to my favourit part. Scrubbing of the old paint. But now I had a, yet again, clean canvas to work with.
Base painting – here we go again
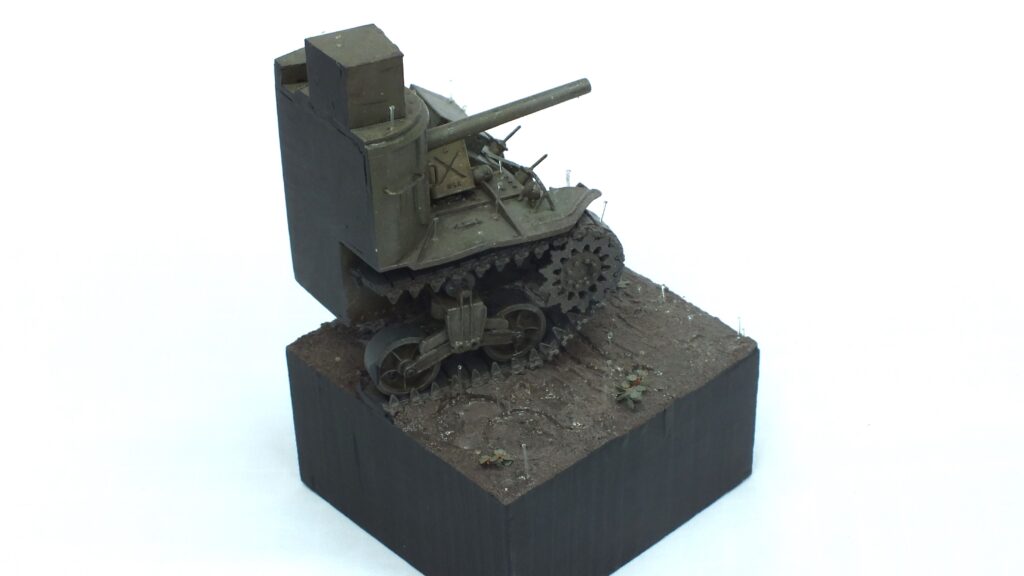
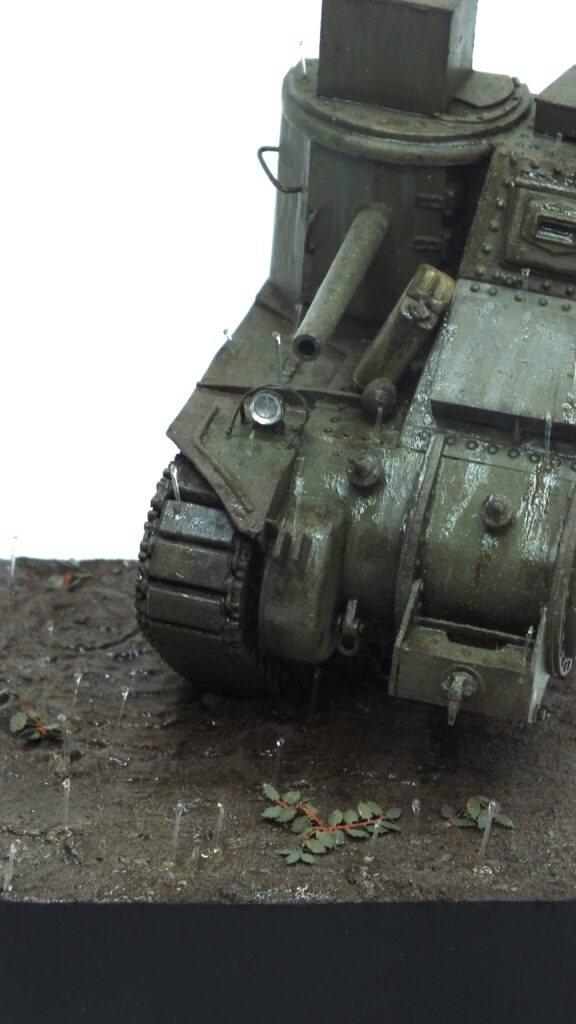
Well, now after I cleaned, washed, dried and primed him very thoroughly I could finally get started with base painting again, oh how much I looove this task. Yeah, doing my least favourit part again, and again, yippie. Anyways… I decided on a normal clean olive drab as the base coat without any camouflage. It is a very small modell with a lot going on and I really wanted to pull the attention to the rain-effects, which we will get to later.
I also painted the other details like the jerrycan and road wheels at this stage. Additionally I painted the “outside” black at this stage. Eventhough it will get dirty and has to be repainted later I still decided to do this, since I can get a clearer picture of the final model, which helps greatly. So well worth the effort.
Weathering – same procedure as last time?
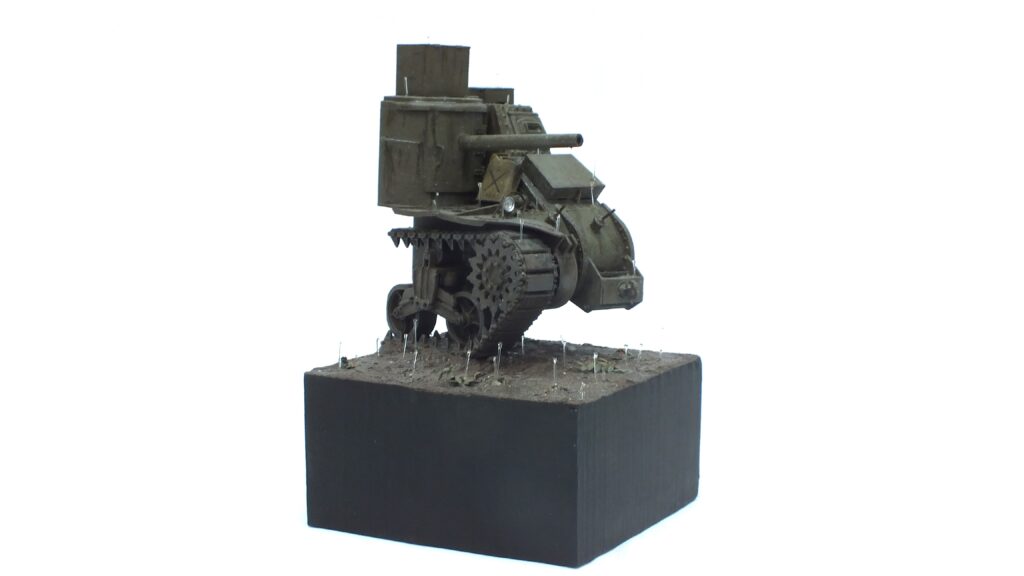
Yes, same procedure as, well, not always, but a lot of times. I really did not reinvent the wheel. I started with some filters, highlights and pinwashes. Then I added my usual procedure of chipping:
1. Light chips with a mix of the base colour and white
2. Dark steel chips using a very dark brown colour
3. Light rust wash wiped away mostly
Afterwards I just added some streaking effects as well as some dark mud textures to the base as well as the model to make both coherent. At this stage I also glued both together. This made handling a lot easier. Now I also painted the small very scarce palnts I added to the ground to finish of the basis for my experiment:
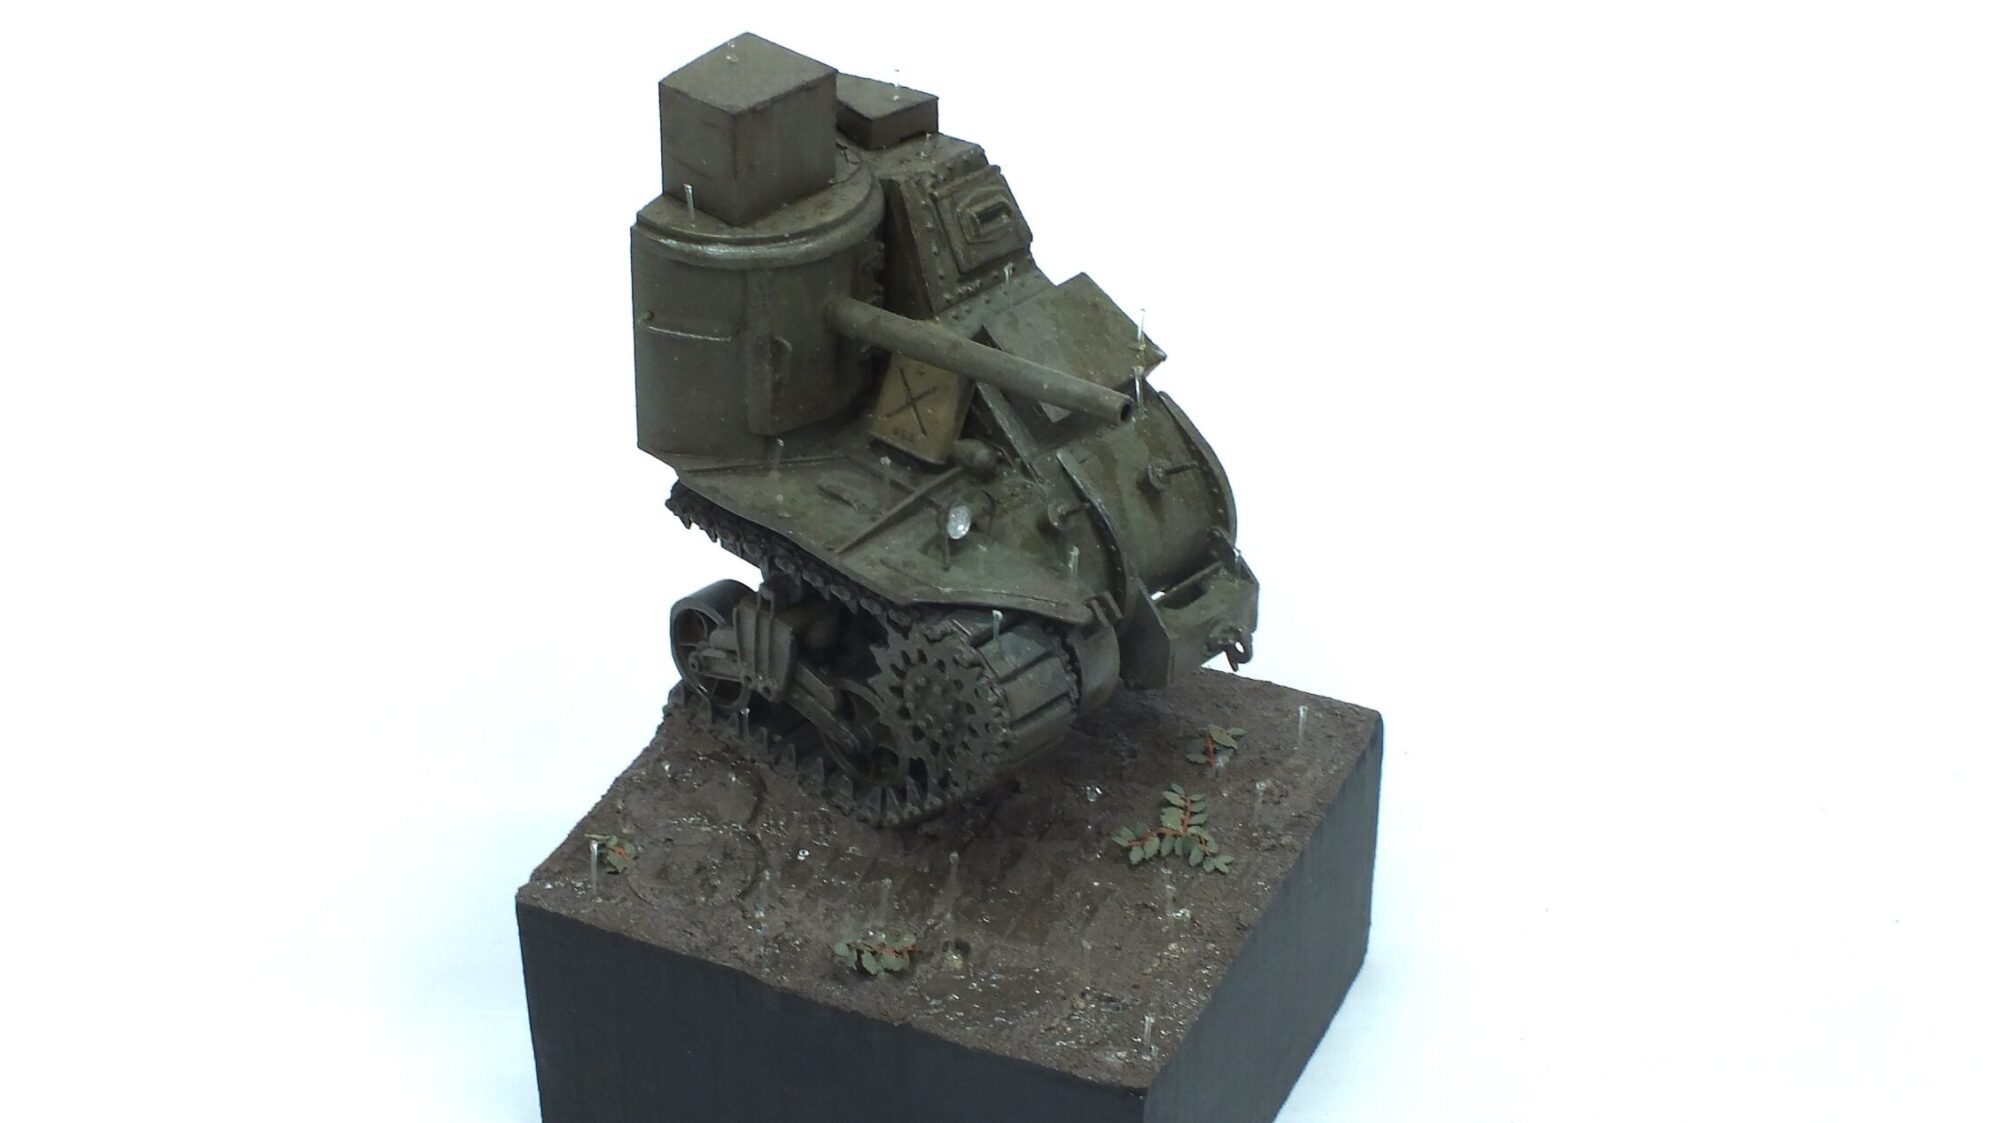
Rain effects – now we are talking
Up to now the model looked almost boring. But I did that not on accident but with full intent, since I wanted to make a small experiment for upcoming models. Wet effects and especially active rain.
First of: Wet effects. Actually very simple. Just a lot of patience with highly diluted wave effects adding them thicker for the puddles and very streaky on the model itself. I also really liked to apply just a drop and then streak them down with an old worn out paint brush. Additionally I mixed in just a tiny bit of brown paint from time to time to give a little bit of variation to the final effect. Here I tried to focus where water would normally accumulate to simulate the end of heavy rain. I focused on spots like the crevices in the ground and inset corners on the model.
Additionally I added small spots in the vertical surfaces like the fender or the stowage box ontop to show raindrops that have just fallen.
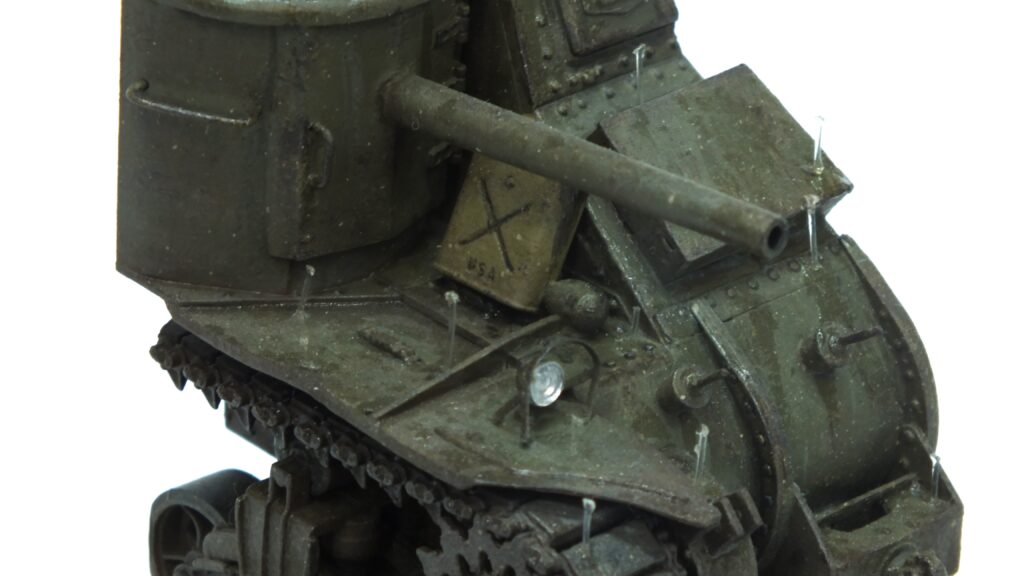
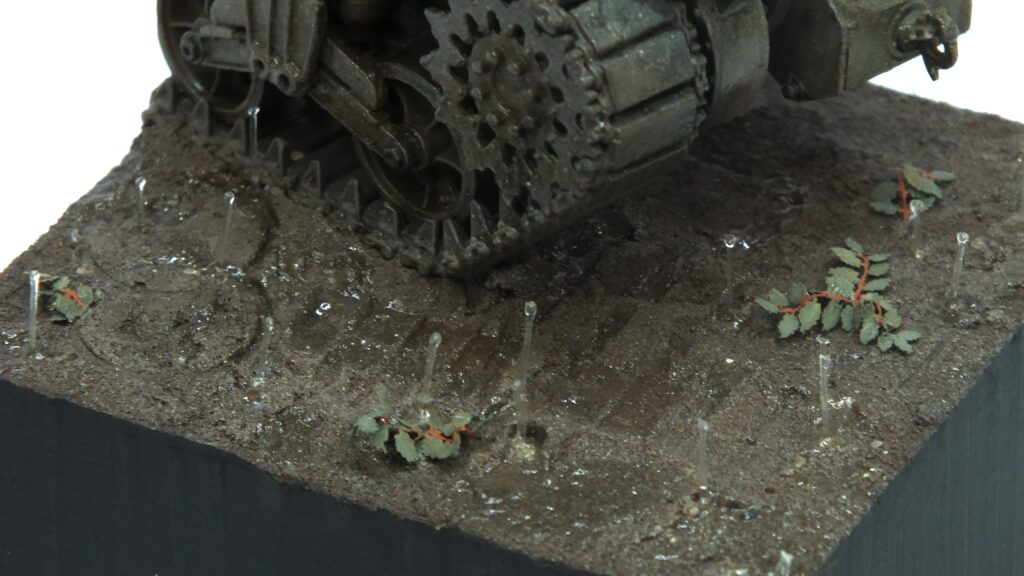
For the active rain drops I cut thin and short pieces of nylon wire to lenght. They are stable enough to stand up on their own when fixed with super glue but flexible enough to not break immediatly. Afterwards I added rather thick effect paint to both the top and bottom of the rain drops. This gave the illusion of them bouncing back up from the ground or tank. To be honest, I am really happy with how it turned out and it actually wasn’t a lot of work at all in the end. Just some patience and calm hands.
Images – a small collection of beaty shots
And now finally, the completed model, finally:


Final thoughts – A rough start with a happy end
That is one advantage of leaving a model this long after a frustrating occurence: You almost forget about all the negative feelings and thus I go out of this porject feeling very happy. It is for sure not the most impressive, biggest or complex project, but I still had a lot of fun and additionally managed to complete an old shelf queen, made another cute wedgie and also managed to sneak in a succesfull experiment. That’s a win in my book atleast. Of course there are always things to improve, especially the back cover, but for such a small and quick project I can’t really complain.
Until we meet again,
Floh out